With technology comes possibilities. And with endless possibilities comes overwhelm.
Where do you start?
It’s a great question, and one I can’t answer—where you start is up to you. But what I can do is give you a whole bunch of ideas to work with.
I’m lumping AI, agents, and automation together because they all involve a tool executing a directive without human intervention. Plus, they often feed into each other for an even more efficient workflow.
These suggestions are aimed at making your content workflows more efficient.
Ideas for Content Development
Consider your existing process rather than changing how you operate.
For people who handwrite their content
The basic concept here is to turn your handwritten notes into digital text.
Take a photo of handwritten notes on your phone. Send yourself the image files (email, Slack). Upload to AI and prompt it to convert images into text.
Instead of sending yourself the image, save the image files on a cloud drive (OneDrive, Google Drive). Use Claude Desktop to grab the files and convert images to text.
Automate the workflow by creating a prompt or agent that sends (via MCP) the transcribed text to a new Word or Google Doc, or another draft system, like Notion.
If you don’t have or can’t access an MCP, have AI create a new file you can save in your doc of choice. Or, have it create a markdown file (good for Notion).
Use a prompt to take the transcribed text and create a draft based on voice context files.
For people who like dictating or have podcasts
Most genAI tools don’t transcribe audio files. There are dedicated ones, though I’m not going to touch on those here. If you work in-house, inquire about dictation/transcription tech—you may already have the technology to do this.
First thing is to capture the audio, of course. Make sure that you know how long you can talk for, otherwise you’ll be in the middle of a thought when it cuts out.
If you have Zoom, you can use its AI to transcribe the meeting audio.
Use your phone’s voice memo app.
Use the voice function on Claude.
You could create a prompt or agent that interviews you, then respond via voice.
If you need to transcribe the audio, convert it using a free tool like AudioConvert.
You can automate pushing the transcribed audio content into another system (Word, Google Doc, Notion) by using a tool like Zapier. For example:
When Zoom renders a new transcript, use Zapier to automate: a new transcript file triggers the creation of a new page in Notion, then adds the transcript for easy drafting/editing.
Take the automation further by adding a step where the content is run through an AI prompt before landing in a doc for review.
Podcasts
If you post your podcast videos to YouTube, Zapier can automate the transcription using Gemini. The flow would be: new video posted on your YouTube channel, use Zapier’s AI function to transcribe the file, then send the text to a doc.
Zapier also allows you to pull in a new podcast from Spotify, and then you can run it through AI transcription.
Ideas for Content Processes & Workflows
How you go about managing your process will depend on your existing tech stack.
For people with an existing project/content management tool
First, you’ll want to figure out what your options are.
Look at direct integrations from/to your PM tool.
Check to see if the tool connects via an MCP. Tools like monday.com, Asana, Todoist, and ClickUp have connections to Claude.
Head to your favorite automation tool (Zapier, make, n8n) to see if your tool connects and what you can do with it (check triggers and actions).
For people without a content management tool
It’s easy to create one, particularly if you use MCPs to do it.
It doesn’t have to be complex, either. It can be a place where you keep your content drafts. Mine sits in Notion. It’s on the simplistic side: draft content, last edited date, target publication date, status. And I like Notion because I can use AI fields and agents in the tool itself, plus the MCP with Claude.
You can also explore direct connections to your website CMS. Proprietary systems will likely be more difficult, but WordPress is one that connects with most tools in some way.
Now, for the ideas
Ask for reports
Manually query using AI or MCP: What did I work on this week? What’s due this week? Give me a summary of what’s open.
Automate these reports with in-tool agents (Notion has them), AI with agents, or even an automation tool like Zapier. These can be run on a schedule (e.g., every week) or trigger (e.g., status changes).
Automate draft processes
Let’s say you finished a draft and want to send it off to the next person.
Use an MCP to connect to your Gmail to send the content draft alongside email copy. Create a prompt or agent that triggers the process of sending it out (asks for the draft URL, asks for the email copy, asks for the contact).
If there’s not an MCP available, create the same process using automation. Automation tools allow for manual input if you don’t want to rely on full automation.
When drafts come back, use automation to update your content system.
Set up an automation where a change triggers adding email content and documents to your content system. For example, create a Gmail label where you manually move the email to that label, which triggers an automation to push that content into Notion.
If you have a dedicated email address, use incoming emails as the trigger.
Use AI as part of the automation to more accurately put content in the right places.
Run agents for review
Develop a “Brand Bot” (agent) that reviews content for brand voice and standards. This can be done manually or automatically based on something like a status trigger.
If you have particular words, phrases, or other details that you’re looking for, you can create an agent that flags problematic areas. For example, it flags any version of “specialize,” or it flags company names other than your firm name, and then sends you a report.
Ideas for Post-Publication
The content process doesn’t end with publication.
Once it’s published, I usually like to keep the published URL alongside the draft content.
If you have a draft system, create an automation that monitors a site feed via RSS, which is the trigger to look up the same title, and then append that item with the publication URL.
If you don’t have a draft system, create an automation that monitors an RSS feed for new items, then creates new database items with the URL and content.
You can create these automations for any website, blog, or even syndicated content (like JD Supra).
Distribute your content on social media
Create automation triggers that send the published content to your social media management tool. Example: new RSS item pushes URL and title to Buffer.
Add AI to the automation that suggests post content based on the article.
Give it a prompt that you run without intervention: new RSS item > content goes through prompt > output in Buffer.
Instead of a direct push to your social management app, send the output to your email or a field in your content system. Example: new RSS item > content goes through prompt > title lookup to match the content draft in Notion > output goes into a text field in that content draft.
Use an in-tool AI field to auto-populate social post suggestions. In Notion, for example, you can create a field with a prompt that reads the content within the page/item, and the output shows up in that field. So: new RSS item > creates a new database item in your content tracker > field auto-populates social post suggestions per your prompt.
Encourage your folks to share content
Use an RSS automation to send new content internally for folks to share on their own social media with a static message.
Add an AI component into the automation where the new post is run through a prompt, and the output becomes a new email draft.
If you want more control over the process or have different processes, use a database structure to do it.
One way: create a new database in Notion (or have an MCP do it). Use an automation to pull new RSS feed items into the database (content, URL). Create fields that manage the process, like a status field and text fields for the content you’ll send. The text fields could be prompt-based or blank for your own input. So it could look like: new RSS item into Notion > the content is run through an AI prompt and output into a specific field > after editing, a status change triggers an email to a list.
Now, let’s say your content includes important “alerts” that get a different internal treatment. Add a select field in your Notion database that triggers a select prompt. A new RSS item appears in your database > you get an email to set the prompt > the field selection of the prompt type triggers an automation that runs the post content through a particular AI prompt > the output appears in a Notion text field > after editing, a status change triggers an email to a list.
If you want to send a LinkedIn post around, draft it in your favorite social media manager and use automation to push information from the social manager to your content database.
Ideas for Utilizing All That Content
Make use of having your content in one location.
Query AI for RFPs, pitches, or even outreach: prompt AI to review content for a topic or in answer to a question. Example: “we’re pitching [this type of client in this industry] with [these types of issues], surface content relevant to this audience.”
Ask AI to generate ideas: “review content published in 2026 and suggest article ideas that align with [this industry’s] appetite.” Use an MCP or content files to reference relevant documentation (e.g., industry research, survey results, practice group plans).
Audit your SEO/GEO/AIO using prompts or agents.
If it’s in a database structure, use the content database to export yearly reports for attorney end-of-year reviews. This would require that the RSS automation into the database include the author(s).
Why stop at your own content?
Use RSS automation to pull in your competitors’ content. Analyze their content using AI to help you position your own content or discover trends.
Do it with publications (that aren’t behind a paywall). Use AI to surface topic ideas or ways to pitch a particular publication or journalist.
Pull in key topics from JD Supra and use agents/AI to identify patterns or hot topics. Use prompts to suggest where your firm can fit into the conversation.
Do this with your clients! Have AI/agents flag certain issues that align with your firm’s services.
Read Part I and Part II of this series before proceeding.
Part I of this series tackled the why. Part II tackled the initial setup. This part—Part III—will explain how I set up my Notion Claude Hub and how it’s incorporated into my workflow.
You’ll see there’s a hierarchy to it. Role content is first, with projects under it.
Parent = Role context Under Role, Projects Under the individual Project: onboarding guide, changelog, other logs, and task queue
Notion makes it easy to reference or even embed content from other pages, so don’t worry about having it in the perfect hierarchy. The important part is ensuring you’ve given Claude what it needs…and only what it needs.
Parent: Role Context
The stuff the AI experts tell you to include. Who you are, what your brand is, how you approach marketing or writing or whatever else. You don’t even have to start from scratch: use the downloadable files people create, and copy and paste into Notion.
I also include any Claude preferences, usually about its output. No em dashes, be concise, be factual, provide sources, ask questions, do not make assumptions.
Whatever content you put here should apply to the whole. One page per role. If necessary, I’ll create sub-pages or link to other Notion pages (e.g., the brand guide) that explain further.
For projects, I create onboarding guides.
Per Project: Onboarding Guide
I have an onboarding guide for each project. It’s meant to get Claude up to speed as quickly as possible on what that project is about. Some examples of what I include:
What the project is and the end goal
What tech I’m using and where it’s located. The components of your project and workflow. Examples from one of my sites:
Basics: Site URL. the theme it’s using, the platform it’s built on
Key plugins or other for this project that Claude will need to use or know about: Advance Custom Fields usage with link to field group database, GitHub* repo location with hyperlink
Key files + locations: Local GitHub path, template repository, custom field list, site page directory
Claude workflows: any procedural things you want Claude to execute.
GitHub deployment process for design files: edit locally, push to main, tell user to pull [code] on site, update site’s changelog
Admin tool** deployment process: link to further instructions on Notion (sub-page), local file locations, instructions on updating site’s admin menu after deployment
Important notes. Examples:
Color scheme reminder and location of brand guide
Naming convention quirk with custom fields (use underscore not dash)
Important Claude notes: sometimes Claude discovers something contrary to its own knowledge, so it’ll write them here
Chat instructions: tasks that you want Claude to execute every time. For me, it’s:
Changelog: log all changes to the Notion changelog after each task is complete
Instructions: note any changes to procedure and update relevant documentation, ask about procedures we haven’t agreed upon changing yet before updating.
*GitHub is how I update design files for this site. **We create backend tools that simplify content entry
The shorter the better. If it starts getting long, create sub-pages that have more detail. The onboarding guide is more about key instructions. Instead, use links to direct Claude to detailed information. Include short descriptions so Claude doesn’t have to waste credits and make a determination itself.
Design Guide
I want to highlight a document that falls under onboarding: the design guide.
I don’t mean your brand specs. I mean how your brand is translated to your output. It’s a granular explanation of preferences on aspects of your projects.
Let’s use websites as an example. Your brand guidelines likely have your colors, taglines, fonts, and logos, but do they have the Google Font you have to use instead? What about a subtle color scheme you developed for categories of content?
It’s something you don’t always think about, but is SUPER handy to have. Use it to document repeatable elements or patterns, like:
Iconography: categorical icons you use across your website that represent your services (technology content always has [this icon])
Site nomenclature: you always call this service “X”
Text style: fonts you use by header, default fonts colors, headers by size. reverse out preferences (color on dark vs light backgrounds)
Element preferences: think post listings, card treatments, hero preferences, pill treatments
Naming conventions: for Notion docs, new files, posts/slugs, field names
Describe the functionality and design. If it’s a visual element, take a screenshot (this is more for you than Claude, but still).
If you use Claude for content, use this concept for personas, specs for each of your social channels, writing preferences, or even grammar guide.
Changelog/Logs
“Changelogs” come from the coding world, but it’s a really handy concept to use with Claude, period. The purpose is to log/track what work you’ve done or completed. It can be really simple or detailed, depending on what you’re doing and what you need to do with the information.
If you ask Claude to build a changelog for you, it’ll look more like a setup I use for websites. It’s not a Notion page, but a database (and yes, Claude can build it for you).
Don’t be intimidated by the “database” term: it’s essentially a spreadsheet with formatted columns. You can even upload a CSV file to create one in Notion and most other database tools.
Any time Claude and/or I update a page template, add or delete a new plugin, or change a procedure, we update the changelog. I personally need a log because I remember nothing, and it’s good for when Claude hallucinates.
My website changelog has:
Descriptive age title (required text)
Date of change (date field)
The type of change (single select field): added, fixed, updated, removed, decided
Work done (database item body): details about what was changed, and if relevant, why
Area/categories for easy filtering (single or multi select field)
Which tool did the work (single select field): Claude Chat or Claude Code
Title of the chat session (text field)
If it’s done or in progress (status field)
Most of the fields are used to pinpoint a place in time as a reminder for when you need it, or even help you figure out which version to rollback to. Despite having memory, Claude isn’t that good at it, so it’s good for human and machine.
Putting it in Notion means it’s searchable and filterable. And both you and Claude can use it! Claude Code adds technical changes: what it changed, with what, and why. Claude Chat adds research, decision thought processes, generated HTML. I add new or deleted plugins, tech subscription changes, content updates…or describe it to Claude and have it add entries for me.
Changelogs don’t have to be complex or technical. They don’t even have to be about change. They’re used for reference to something done in the past.
Here are examples of how you can use logs:
Chat summaries: have Claude summarize your chat when you’re done
Recaps: log any decisions made, tasks created, or tasks completed.
Prompts: build your own prompt database
Task procedures: how you want Claude to execute a task or action (think of these like agents)
Documents: create a file repository of AI-generated documents (research summaries, competitor analyses, audit findings)
Task Queue
The last piece of the Notion puzzle I recommend is a task queue. This can double as your own task manager. You can have a queue per role or project, or even one queue to rule them all.
AI tools are still lacking in the complexity department. Meaning, it’s hard for Claude to accomplish several tasks at one time. If I’m providing feedback on a design template, for example. I usually have more than one change I want to make, so I list (numerically) the changes, and ask Claude to start with task #1 and add the rest to the task queue to start on next.
Sometimes, I’ll be working on one thing that requires a completely new set of tasks. Rather than hoping either of us remembers, it’s added to the queue.
Having a queue is helpful for a few other reasons:
You can surface overlapping tasks/ideas
Filter and search to locate keywords or specific tasks
Use PM methods to organize and prioritize tasks
Like the other pages, the task queue can be simple or complex. At minimum, I suggest:
Title and date
Raw idea/description
Why the task matters/end goal/reason for existence
Status (open, in progress, done)
The reason you want the idea and why it matters is because sometimes we—Claude included—get stuck in the tool or function and loses sight of why it exists in the first place. If your tasks are on the simpler side, you can always combine the two or use Notion’s page content area to put both.
You can also include:
Priority
Effort estimate (Claude would estimate this – actual time or time blocks)
Last updated
Project or categorical area (for easy filtering)
Next step/where you left off (great for tasks that take longer)
For simpler setups, use your task queue as a place to put project contexts. Think of database items as little project plans: add all your context and direct Claude to it. Have Claude update it!
I’ve got multiple projects with different brands and configurations, so I separate reference content (logs) from tasks (queue). If something is useful beyond the task, that information gets migrated to the place it needs to go (log or guide).
This setup should help you organize your Claude work in a way that saves you and Claude time, energy, and resources…and maybe even some heartache. 😉 Make it simpler or more complex to suit your needs.
Part I explained the thought process behind and benefits of using Claude’s Notion MCP for context documentation. In Part II (this article),
In order to make this work, you need:
a Notion account, and
to have already set up your MCP through Claude Desktop
How you choose to set up your Notion files is totally up to you. From here on out, I’ll be using the way I set it up as an example. There’s really no right or wrong way to do this, and whatever you set up should make your workflow easier.
Structure Setup
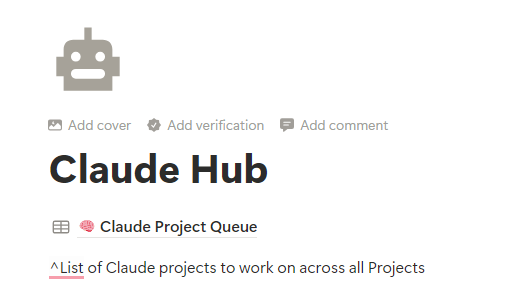
I’ve already got a lot of information in my Notion account, so I created a new space for Claude documents (I have the paid version of Notion, so I created a new teamspace). My thought is that I didn’t want Claude to waste resources reading files that don’t have relevance, so I have a section called “Claude Hub.”
Under that, I have a section for each one of my roles. It helps to mirror Claude Projects that already exist.
Notion’s hierarchy is basically a site tree, so organization of content is easy. The cool part is that each level is a page with functional blocks, so not only can I stack and organize pages, I can explain those sub-pages in the main page.
Under my Claude Hub, I have a single database I use for a project/task queue (more on that in Part III). As you can see here, I added text to explain what it is.
Also under the Claude Hub parent are sections for each project. I treat the project parent as a table of contents to the actual project information. Some are basic links with short descriptions, others are highlighted to be used with every instance or key documents with more detail.
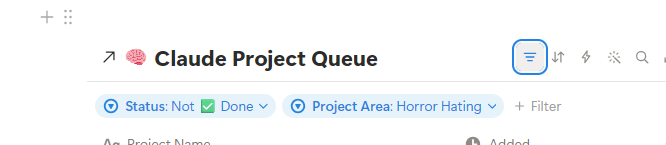
Below is the setup for one of my websites (where I catalog the horror genre). I use the functional blocks to create important sections for Claude to read: brand guidelines, an onboarding guide, and the site’s changelog.
I also embedded the Claude Project Queue database here, but filtered by the Project Area, so Claude knows which projects/tasks to work on within this area. Notion allows you to take a database from a different location and display whatever view/filters you so choose. So in this example, I’ve filtered the queue list by the Project Area (Horror Hating) and Status (tasks that aren’t complete).
Direct, don’t dump
You don’t want to waste time or energy having Claude (or you) sort through a ton of information. Think of this setup as a true hierarchy. Essentially, you’re setting up a trail for Claude to follow so Claude can follow the logic of the hierarchy to find the right information for the task at hand.
Or put another way, create a roadmap. “If we’re working on X task, then start here.” For more information, go here for instructions, do this every time…use those setups to lead Claude on a path for relevant information. Do not just “data dump” context in one place – think about what Claude needs to know and when.
Using the Notion Claude Hub
Once you’ve set up your system (see Part III on my recommended Notion setup), here’s how you can use it:
For Claude Projects, add the Notion link for that particular project to your instructions. This essentially takes the place of the desktop .md context files.
For specific projects/tasks/workflows, drop the URL in a new Claude chat to get it up to speed quickly.
Reference research summaries or other documentation for context
In the next part of the series, I’ll explain my Notion Claude Hub setup and how it’s incorporated into my workflow.
Now that LLMs can read and use context files before initially responding, your AI output becomes that much better.
I listened to all the experts and created .md (notes/plain text) files for myself, each role/hat, and then for each project. While the “about me” text didn’t stale, the other two files did. Maybe the role doesn’t change often, but you find yourself realizing you need to refine it as you learn how it all works together with AI. And the project files were continually changing.
It really isn’t that difficult to update a text file, but those documents are hard to read though. Not only that, I can’t keep up with the changes on the project ones.
As I went along with longer-term projects, I discovered:
Project files became obsolete quickly, particularly when it was a new idea. You set out doing one thing and discovered a better way.
It’s a pain to search through desktop files. And some of those text files were super long, making it hard to determine what you need to update.
You drain your usage quicker using context files within projects.
If you have a Project folder per role, projects within that umbrella can stack up quickly. If you have a context file for each project under a Project folder, then you’re wasting usage. But then you’re uploading and downloading files making the Project context obsolete.
All in all, managing the context files became a whole ‘nother task.
Then I got an idea.
I’m a heavy Notion.so user, so when I downloaded Claude Desktop, I made sure to connect Notion through Claude’s MCP. If I could use the Notion MCP to create databases and pages…why couldn’t I use this system for context files?
That’s just what I did—let me show you how to do the same.
Note that I use “projects” in two different ways here:
Lowercase is the normal meaning (”I am working on a fun project…”)
Initial caps is in reference to Claude’s Project feature
Tools I’m using for this instance
Claude Desktop (free)
Notion (through browser, free or paid account)
When to use MCPs for context writing
This method can get complicated and overwhelming quickly, so it might be overkill for some users.
For context files
I have a lot of things going on at any given time: personal life, business & brand, special projects (there are at least three), and work. I setup Project folders in Claude for each one of those areas, and then created for when the instructions got too granular or separate from the whole. For example: my work has two distinct components, so there’s one Project folder for each. Then I write personally for work, so there’s another folder for that. And then another one for branded communications.
You see how this gets complicated fast.
Context files on your desktop are great for information that doesn’t change, or changes very little over time. But when you’ve got multiple projects going on that need different contexts, or context that changes often, this would be a good solution for you.
For communication between chats
This is really where the method shines.
Some of my projects involve coding, which means I’m going back and forth between Claude Chat, which is better for research and design, and Claude Code, which is best for technical aspects and execution. I became frustrated having to reexplain things, upload the same documents into the various chats, and even having to explain Claude Chat’s thinking to Claude Code.
Or even worse, sometimes the chat thread would hit capacity or throw an error, which means I was forced to recreate or try to explain where we were at to a different chat.
Now I use Notion for site changelogs, procedural instructions, and even onboarding files.
Benefits of Using Notion + Claude MCP for Context Files
Claude can write context files for you (saves time)
Easier to manually maintain: easier to read through formatting, and Notion has great search capabilities
Can have multiple sets of contexts without draining your usage
More seamless transition between products and chats
You can use your context files ON THE GO! Once you MCP is set up, you can use it outside of Claude Desktop
In case you didn’t heed the instructions above, make sure you’ve backed up anything that exists and have a record of important pages, posts, and customizations.
Chat to Research & Refine, Code to Implement
AI’s chat tool is much better at research and ideation than Code. Code does the technical very well; chat, not so much. Use chat for design iterations, functionality ideation—anything that’s directly related to the implementation of code (or other technical implementation).
The Challenge: Chat and Code Don’t Talk
Claude Chat and Claude code do not automatically communicate. I found myself having to manually upload and download, reexplain, or try to figure out what one was thinking.
Like others, I created a source .md file that explained who I was and what I was looking for. The problem is that things change quickly when you’re “working on the go.” It was a nightmare to remember what to update and where.
I’m a heavy Notion.so user – I use it for notes, databases, and a lot more. And Notion happens to be configurable as an MCP with Claude desktop.
What is an MCP?
MCP or Model Context Protocol. It’s a way for LLMs to integrate and share data with external tools.
Once the MCP was connected, I created a Notion “hub” for my project documentation. The beauty of this is that instead of me updating and uploading/downloading, I have Claude do it.
Example: I’ll have Claude Chat create a competitor analysis for a website idea, then a concept, and ultimately a design template. I’ll ask Claude Chat to update the Notion documentation for Claude Code to implement and even have it create a message to send to Code to get started.
Doing it this way will actually help you save usage credits, since Claude desktop will automatically read any files you’ve updated to Claude projects.
That’s the basic concept. Let’s dig into the details of structuring your Claude Website Hub.
Documentation
I use both a desktop folder and Notion when I vibe code.
The desktop file contains any documents I might upload to Claude or even Claude outputs (HTML design mockups, for example). Each project has a single folder (potentially with subfolders, but that’s up to you).
In Notion, I’ll create a page for each project. This is where I’ll put any source documents (what the project is, for example) and where Claude will update its documentation.
I’ll use one of my websites as an example throughout: it’s a WordPress website I built that catalogs horror movies. First, I set up a folder on my desktop and then created a page in Notion named “Horror Hating Claude Hub.”
There are a few pages I recommend when vibecoding:
An onboarding guide: this you’ll use when you’re going between Claude Chat and Claude Code, or when you start a new project chat in Claude.
A changelog that tracks the changes you’ve made with Claude.
A queue or backlog: Claude doesn’t do a great job with multiple requests at the same time, so I have a list of other tasks I want Claude to tackle.
A versionlog that tracks iterations of something, like design iterations of a single page. It helps when you’re dealing with a lot of content.
Onboarding Guide
The onboarding guide’s purpose is to get Claude up to speed on your project and preferred workflow as quickly as possible. This will likely need to be updated as you go along, but I recommend including:
A brief description of your site and the technology it uses. For my site, I include:
Website platform
Template details
Plugins functions and any customizations
Key file locations & what they’re used for
Brand-related documents
Git Hub repository location
Site quirks & their workarounds
One plugin of mine has atypical URL conventions, for example
Procedural preferences
“Always check [file location] before page styling”
“Log all changes into [changelog] after each task is complete”
Keep the entire thing as brief as possible. Detailed information should be in a subpage unless it’s a critical to every project within your site.
Changelog
This might be the thing that saves you when you’re vibe coding. AI often forgets or will roll back changes when you least expect it, particularly when you’re working on a site over time.
What you include in your changelog is up to you. I recommend thorough but not granular.
Through Notion, Claude can set up a database structure:
Title and date
Area/categories for easy filtering: some of mine include tools, Notion, templates, and custom fields
Customization taxonomies: I have multiple post types and categories
Which tool did the work: Claude Chat or Claude Code
Which chat session it’s in (so you can find it later if you need to)
If it’s done or in progress
The type of change: added, fixed, updated, removed, decided
Claude Code knows what a changelog is, so it’s likely to include more details within the body of the Notion database item. Still, either instruct it to include enough details to know what’s been done or double-check the entries after they’re created to ensure the information you want is being saved.
The beauty of the backlog is that it’s easier for Claude to identify (through categories) and review data that’s directly relevant vs having to sort through all the content to find the right information.
Queue/Backlog
It’s not necessary to have a backlog of tasks, but it is very helpful for multi-step/extended projects or complex tasks. You can absolutely use some kind of project or task manager and manage this manually, but I like to have Claude help me update these items (and create the database in the first place).
The queue database can range from simple to thorough—and you already know mine falls on the thorough side. 😉 At minimum, I’d include:
Title and date
Raw idea/description
Why the task matters/end goal/reason for existence
Status (open, in progress, done)
The reason you want the idea and why it matters is because sometimes we—Claude included—get stuck in the tool or function and loses sight of why it exists in the first place. If your tasks are on the simpler side, you can always combine the two or use Notion’s content area to put both.
For longer or more complex queues, include:
Priority
Effort estimate (Claude would estimate this)
Last updated
Project area (for easy filtering)
Use the content area to add further or extended detail.
You can add items manually: it’s essentially a task or project list, so add tasks as you think of them. You can also use these task items as a place to upload source content. For example, you want Claude to create an editorial calendar for you. Add files (Notion lets you do that), links, suggestions, lists—that way, Claude has all the source materials in one location.
You can also have Claude add to the database: this seems to happen while I’m having Claude complete something else. We’ll be working on a task that then surfaces a new subtask, so I have Claude add that to the queue.
It can also become part of your onboarding document: for example, you use GitHub tokens and need to change every 30 days. Include the schedule or spec in the onboarding document to have Claude check that task. (Bonus: if you’ve got Gmail connected, you could have Claude watch for the GitHub email warning you it’s time to change your token.)
Version Log
Honestly, you could have a version log for many things. I have a version log for my writing, page content, design templates, snippets…the point is to track versions so you could
rollback to them,
borrow for a future version, or
review what worked/didn’t.
Despite having memory and search capabilities, Claude doesn’t remember everything, and this will shorten the response time and save on usage.
Here’s how I use this type of log:
Content Draft Log
I’m a writer, so I typically go through a few drafts before finalizing. I use my content log manually because I don’t use Claude to write for me, but you could. Or, reference it in Claude to have it edit for grammar, brainstorm titles, or create draft social posts for you.
Claude cannot relate content within Notion, but you can manually relate items if it benefits you. I do this for my content: I have one database that houses the main piece of content/idea (the parent) and then relate drafts to it (the children). (I automate this within Notion, but that’s a tutorial for another day).
I recommend this type of version log if you’re updating/refining content on a site page over time. I’ll often remember something I wrote from a previous version.
Putting it in Notion makes it searchable, too, so it’s easier to find.
Template Log
I highly recommend this if you’re doing any design work on your site. Even if GitHub keeps a version of it, it’s going to be a PITA to find in folders vs Notion’s searchable database. It’s easier of Claude does this—ask it what format it wants the version in. Claude and I use PHP code, so that’s what we record. You can either put the content directly into Notion, or reference the location of where it’s located on your desktop.
It can help to keep screenshots of the design, as most of us aren’t going to be visualizing code ourselves. I don’t do this very often because either I have to do it (and it takes a lot of time) or Claude does (and it takes a lot of time and resources). I screenshot elements of the design I like that I’m not using but I like and I could use later. Like if you’re designing something, and the section isn’t right for the page, but maybe you can use it somewhere else—that’s when it’s good to take a visual snapshot.
The exciting thing about AI is that it can help you do things you ordinarily might not have tried. Coding is a great example of that: it’s not typically something you’d pick up if you have zero experience with it. And that’s good to keep in mind if you do, as it should dictate how you go about “vibe coding.”
What is vibe coding?
Software development assisted by artificial intelligence.
There are varying levels of vibe coding and ways of implementing your creations. The less coding experience or knowledge you have, the more I suggest using a third-party app that exists to do just that. This part of the Intro to Vibe Coding series may help explain why.
Now, I am not a developer. I’m in the “enough to be dangerous” crowd. My background is not in technology, but my dad is an early tech adopter and wrote code for IBM in the ’80s/’90s. I can read and understand the major code languages, but I couldn’t build you a site from scratch.
This series is mostly for the “enough to be dangerous” folks, but it might be helpful for other ends of the spectrum. Part I (this one) tackles what to consider and why, and what to do before you even start vibe coding.
Considerations
Start with the idea, not the technology
Vibe coding isn’t going to give you the idea. That’s on you. It can help you refine, but at the end of the day, whatever you build isn’t going to exist without human brainpower. I mean, it can, but what’s the point of mediocrity or plagiarism? (Seriously, AI has no inherent originality.)
Consider your tech-savviness
It’s imperative you consider your tech skills and be realistic about them. There’s a lot that can go wrong, from breaking your site to inviting security risks, so consider how you’d handle any issues or breaks when you’re coding. This is important to keep in mind for:
Folks who have zero coding experience: it’s important to pick the right tech tool to assist you and be that layer of security.
Folks who are tech savvy but not code-savvy: you may be bold enough to try, but make sure you’ve got the right structures in place.
Select the right tech partners
If you’re a coding novice, don’t go right into your site technology. Start smaller, either with a new project or a third-party piece of technology like Lovable that can help you implement your idea. It’s helpful to have technology that:
Allows you to roll back changes without coding knowledge
Has a security layer (doesn’t let you add just any old code, in other words)
I’m not here to police anyone’s usage of AI, but I highly recommend using your first iterations as a way to learn your own process. You don’t know what you don’t know, of course, but it’s helpful to experiment with the tech before releasing something into the wilds. Trust me, you’re not going to want to launch something you can’t fix or manage.
For those more comfortable with technology and into DIYing websites and/or apps, make sure you’ve got a good host. They’ll be the ones to help you if something breaks, as it ultimately will. Make sure they have good customer service.
Before You Do Anything
If you’re working on an existing site or instance…
BACK IT UP. Back it up, and then confirm you backed it up. (In other words, make sure you know where it’s saved.)
Take inventory of what exists. Yes, AI can be handy for this, but direct exports are going to be more accurate. Pages, posts, plugins, any custom functionality. Download everything and create a list. And speaking of lists…
Create a repository. You’ll want one place to house your documents and one to put your files and notes. This can be the same place – highly recommend a desktop folder at minimum – but I’m going to convince you to use a writeable system in tandem…which I’ll tackle in Part II!